iStudio Publisher icon

Drag and Drop

Drag and drop provides a fast and convenient way of moving shapes or text within the same document window, inserting images from other applications, copying text between different iStudio Publisher documents, or copying text to and from other applications.

All of the drag and drop features are also available as copy and paste features, which are described here:

Drag and Drop from Other Applications

From other applications, you can drag in:

Images, including PDF/EPS/AI format.

Rich styled text from Pages, TextEdit, web browsers, and others.

NOTE: You can't drag in text from Microsoft Word - use copy and paste instead.

Plain text from any control in most applications, from URL strings, from text editors, and others.

One or more files containing any of the above in any combination. Incompatible files are ignored (e.g. video files).

Here are some more details:

If dragging in one image only and over a shape, the image will be dropped into the shape, replacing any current image. A visual indication shows which shape will receive the drop.

If dragging in text only and the mouse is over a text flow, you get a cursor indicating the drop position. If the text is in multiple files, it's amalgamated and inserted at the cursor.

NOTE: Optionally, you can modify both of these operations to create new shapes to hold the dragged content - do this by holding down the Shift key when dropping.

For all other cases, the content is dropped into a new set of shapes, with the position of the first shape based upon the mouse drop position, and others offset at 5mm right and 5mm down from each other.

Dragging into iStudio Publisher from other applications, or dragging between different iStudio Publisher documents, will always be a copy operation, and so accompanied by a (+) sign on the mouse.

IMPORTANT: When dragging a raster image (with PNG, JPEG, or GIF file format) from some applications (including web browsers) the image may only be made available on the system Clipboard to drop in TIFF format. TIFF uses lossless compression (or no compression), which can greatly increase the file storage size compared to the original image format. To prevent document file size bloat you should avoid dropping TIFF converted images into a document directly from these applications. Instead, save or export an image in its native file format to your Mac's file system, before then inserting it into your document as a separate step. No TIFF conversion takes place when using drag and drop to add image files from Finder (which includes files on your Desktop), or to transfer images within or between iStudio Publisher documents.

NOTE: After adding an image to a document you can check its file format using the Image Inspector.
Drag and Drop within iStudio Publisher

In the current release of iStudio Publisher you can drag shapes, images (contained in shapes), and text between different pages (spreads) within the same document window. You can also drag text between different windows onto the same iStudio Publisher document, between different page types (master/body), between different iStudio Publisher documents, and out of the application.

NOTE: The current release of iStudio Publisher doesn't support dragging shapes between different document windows or dragging images out of shapes (or out of the application). We plan to add these capabilities to a future version.

To drag and drop shapes:

Select the shapes.

Click over the selection and drag to a different page (spread) in the same document window.

To drag and drop text:

Select the text.

Click and hold over the selection for a small pause, until the mouse becomes a pointer.

You can now perform any of the following actions:

drag somewhere else in the same text flow

drag to a different flow in the same document

drag onto a blank page/canvas area in the same document

drag to a different iStudio Publisher document

drag out of the application

NOTE: By default, a move-drag operation occurs if the destination document is the same as the source, including between different windows onto the same iStudio Publisher document. It becomes a copy-drag operation if you drag between different iStudio Publisher documents or out of the application.

Here are some more details:

With a move-drag, you can turn it into a copy-drag by holding down the ALT key.

If the text drop is onto a flow, you get an insertion cursor showing where the drop will go.

You can't drag a selection back onto itself, either in the same window or via a different window onto the same document. You can drag it to either side of the selection.

Drag and Drop Auto-scrolling

When you're working in a document window and want to move to an out-of-view area of your document, you will naturally move your mouse to the edge of the document window. iStudio Publisher helpfully detects this and automatically moves (scrolls) the current view; this is referred to as auto-scrolling.

It's useful to understand that auto-scrolling behaves in one of two different ways; depending on the circumstances.

Auto-scrolling for internal only editing operations

Auto-scrolling for internal only editing operations includes when creating, editing and moving shapes, or dragging to select shapes or text.

Here's how to control this form of auto-scrolling:

To start auto-scrolling, move your mouse outside the document viewing area; anywhere over the surrounding window framework, or even away from the window altogether.

To increase scrolling speed, move further away from the document viewing area; scrolling speed increases linearly with increasing distance.

Auto-scrolling for dragging in or out

Auto-scrolling for dragging in or out, includes dragging internally with the potential to drag content out, and more specifically includes when dragging text internally, dragging text and images into the application, and dragging text out of the application.

Auto-scrolling in this situation needs to use a different mechanism from internal only auto-scrolling because as soon as you move your mouse outside the document viewing area, the operating system needs to take over control from the application in readiness for dragging into a different window.

Here's how to control this form of auto-scrolling:

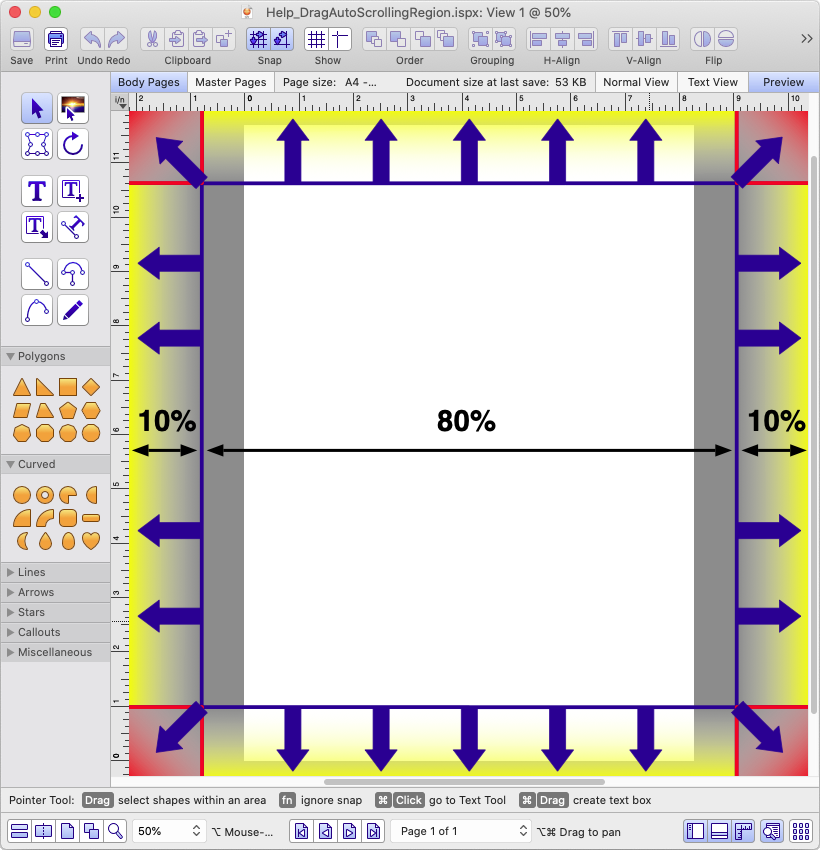
To start auto-scrolling, pause your mouse in the outermost 10% of the document viewing area for a short time, i.e. outside the 80% blue rectangle shown in the figure below.

To increase scrolling speed, move closer to the edge of the document viewing area; marked by the darker yellow and red shading in the figure below.

To scroll in two directions at the same time, move to the corners of the document viewing area; shown by the red rectangles in the figure below.

Drag auto-scroll region

Related Topics

Cut, Copy and Paste