Multi-Line Tool

Multi-Line Tool

Multi-Line Tool Heads-Up Display

The Multi-Line Tool is for drawing shapes constructed from one or more line segments of seven different types.

To select the Multi-Line Tool click its icon in the Toolkit panel, or choose menu option Edit > Select Tool > Multi-Line Tool (or keyboard shortcut  ⌃M  Control-M). Selecting the Multi-Line Tool opens the Multi-Line Tool heads-up display (HUD), as shown right.

To keep the Multi-Line Tool selected, so as to enable multiple shapes to be drawn without having to reselect the Multi-Line Tool each time, press the Caps Lock key  ⇪ . Note that this "turns on" the caps lock function and you'll need to press the Caps Lock key again to turn it off when you've finished drawing.

Drag the HUD anywhere on its title bar or background to reposition it on your screen.

Use the HUD to view and select the Line Type of the current line segment and its Alignment with the previous segment. Current HUD selections are highlighted in orange. Shortcut keys 1-7, T, N, H and V are provided as an alternative selection method.

To draw a multi-line shape:

Select the Multi-Line Tool.

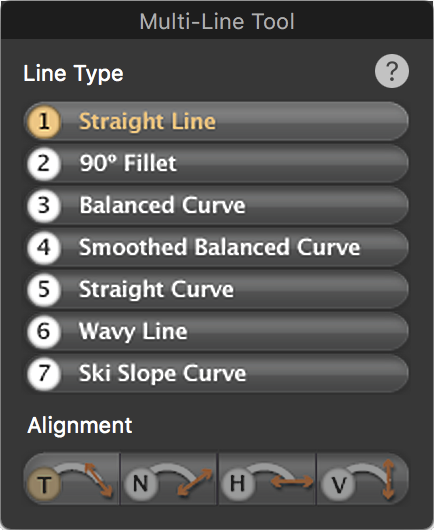
Select the Line Type and Alignment of the first line segment - see the following sections for more information. You can change the Line Type and Alignment selections at any time by using the HUD controls or the keyboard shortcuts.

Click to start drawing the first line segment.

Click again to complete the first line segment, which also starts drawing a second line segment.

Continue constructing your shape in this way by adding more line segments. Every click adds another line segment. The Line Type and Alignment selections can be changed at any time.

To correct a mistake, press the Backspace key to delete the last line segment drawn. Press the Backspace key repeatedly to delete more than one line segment. Press the Escape key to delete all of the line segments and start drawing the shape again.

End drawing by double clicking. To draw a closed shape, end drawing sufficiently near to the start position to display the mouse text "Double-click to Close", which will join the last line segment to the first one.

Adjust the shape in various ways using the Pointer, Reshaping and Rotation Tools.

About the Line Types

There are seven different Line Types, as follows:

Straight Line (or keyboard shortcut: 1)

90° Fillet (or keyboard shortcut: 2) is a quarter elliptical arc

Balanced Curve (or keyboard shortcut: 3) is a curve whose slope and extents depend on the distance and angle of its end location from its start location

Smoothed Balanced Curve (or keyboard shortcut: 4) is a balanced curve, but also smoothed into the previous curve, if possible

Straight Curve (or keyboard shortcut: 5) is a curve whose nodes are initially in a straight line

Wavy Line (or keyboard shortcut: 6) is an approximation to a sine curve, similar to the wavy line in the Shape Library

Ski Slope Curve (or keyboard shortcut: 7) is a curve that starts and ends with the same gradient

A good way to discover and understand the differences between the line types is to experiment with them and then select the shapes you have drawn with the Reshaping Tool, so as to display the different ways in which Bezier handles have been applied to the different line types.

About Setting the Alignment

Use the Alignment setting to control the alignment of the current curve with its previous line segment.

There are four Alignment options, as follows:

Continue in the same direction (tangent) (or keyboard shortcut: t or T)

Continue at 90° (normal), clockwise or anticlockwise (or keyboard shortcut: n or N)

Continue horizontally, left or right (or keyboard shortcut: h or H)

Continue vertically, up or down (or keyboard shortcut: v or V)

NOTE 1: The Alignment setting is disabled for Straight Lines and Straight Curves because these line types can leave the previous line segment at any angle.

NOTE 2: For the first line segment (if it's a curve) you can choose between either a horizontal or vertical takeaway. If you require a different starting angle for a curve then you can achieve this by rotating your shape after drawing it.

Related Topics

The Toolkit

The Inspectors