iStudio Publisher icon

Text Selection and Formatting

This page describes two different ways of selecting text for the purposes of applying the character format settings, which are those available on the Character Inspector. Understanding these selection methods is important for users who want to gain full control over line spacing.

The format or style of every character is controlled at two levels, both of which you can adjust:

Firstly, paragraph level character settings apply to all of the characters throughout a whole paragraph. Each character forms part of a paragraph and each paragraph has its own set of paragraph level character settings that define the default format for all of the characters within the paragraph.

Secondly, individual character settings can be applied to individual characters. Applying individual character settings is optional, but if applied these will always override and take precedence over the corresponding paragraph level character settings.

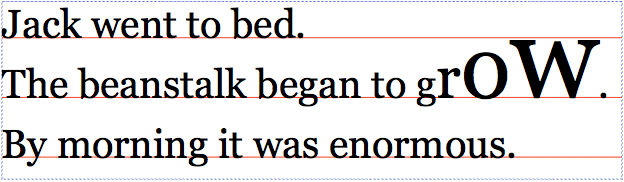
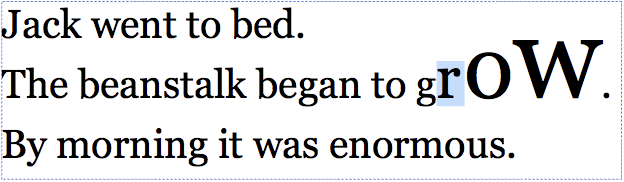
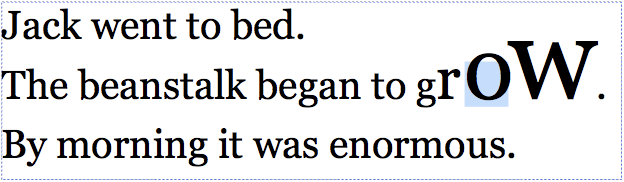
Here's an example of how this works in practice. Imagine this paragraph forms part of an iStudio Publisher document. It has a paragraph level character setting of no underline. To underline just these characters their individual character setting has been set to underline.

IMPORTANT: When the Return key is pressed the paragraph level character settings carry forwards to the next paragraph and any individual character settings will not influence the text formatting of the next paragraph. Similarly, if existing text is selected and overtyped it will revert to its paragraph level character settings, and any individual character setting overrides will be removed.

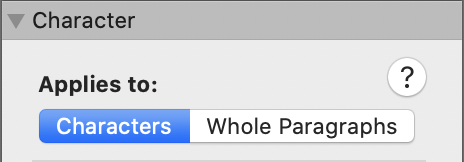
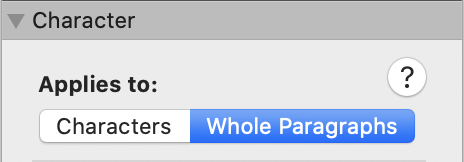
Two modes of text selection are available - character selection mode and paragraph selection mode. If you select text in character selection mode your character format settings are applied at the individual character level, whereas in paragraph selection mode your character format settings are applied at the paragraph level. For applying most of the Character Inspector settings it doesn't much matter which selection mode you choose. However, it becomes really important if you have changed the Line Spacing control on the Paragraph Inspector from the default setting of Auto to either Scaled or Exactly and you want to change the font size. For more information about this see below the section "How changes to font size will affect text layout".

NOTE: These two selection modes (character or paragraph) are only significant when applying Character Inspector settings and make no difference when applying Paragraph Inspector settings, which are always applied at the paragraph level.

To select text:

There are two selection modes for text:

character selection mode (blue selection)

Character selection shown in blue

paragraph selection mode (purple selection)

Paragraph selection shown in purple

Enter character selection mode by:

clicking and dragging across text, or

double clicking to select a word (and dragging if required), or

clicking the Characters selector on the Character Inspector, as shown.

Characters selector on the Character Inspector

Enter paragraph selection mode by:

triple clicking on a paragraph (and dragging if required), or

quadruple clicking on a paragraph (to Select All in Flow), or

Select All in Flow, either from the Edit menu, or by using Command-A, or

clicking the Whole Paragraphs button on the Character Inspector, as shown.

Whole Paragraphs button on the Character Inspector

To format text:

Start by selecting some text, in either character selection mode or paragraph selection mode.

Apply the character format settings from the Character Inspector or the menus.

If you select any text that has individual character settings applied, the Character Inspector's Remove Character Overrides button is enabled. Click this button to remove the individual character settings and reapply the paragraph level character settings.

Remove Character Overrides button enabled

If the Character Inspector's Remove Character Overrides button is grayed out (disabled) this confirms that the selected text has no individual character settings applied.

How changes to font size will affect text layout

In paragraph selection mode, any changes you make to the font size will automatically adjust the first line offset, which is the perpendicular distance from the baseline of the first line of text to the top edge of the containing shape. Changes to font size may also affect the line spacing, depending on which line spacing mode is selected. Here's a summary of the effect that changing the font size has on the first line offset and on the line spacing for each of the different line spacing modes - Auto, Scaled and Exactly:

Auto - first line offset: adjusts; line spacing: adjusts

Scaled - first line offset: adjusts; line spacing: adjusts

Exactly - first line offset: adjusts; line spacing: fixed

NOTE: The line spacing and line spacing mode are set in the Paragraph Inspector. By default, the line spacing mode is set to Auto, which provides automatic adjustment of line spacing in proportion to the largest font size.

In character selection mode, any changes you make to the font size will only adjust the first line offset if the line spacing mode is set to Auto. Here's a summary of the effect that changing the font size has on the first line offset and on the line spacing for each of the different line spacing modes:

Auto - first line offset: adjusts; line spacing: adjusts

Scaled - first line offset: fixed; line spacing: fixed

Exactly - first line offset: fixed; line spacing: fixed

NOTE: Differences between the two selection modes these are highlighted in italic font.

IMPORTANT: In character selection mode, and if the line spacing mode is set to either Scaled or Exactly, increasing the font size will cause the top of the first line of text to be cropped because the first line offset remains unchanged, as shown here:

Character selection shown in blue

With the line spacing mode set to either Scaled or Exactly, you should use paragraph selection mode to increase font size, as shown here:

Paragraph selection shown in purple

In this case, the first line offset has been increased automatically to accommodate the increased text size.

Text formatting tips

Keep the line spacing mode set to Auto if you want the line spacing adjustment to be based on the largest font size on a line.

To increase the font size of a few characters in a paragraph whilst maintaining a fixed line spacing, set the line spacing mode to either Scaled or Exactly. Here's the result, with menu option View > Baselines selected to show the even line spacing:

Paragraphs with Mixed font sizes with fixed line spacings

You can sometimes improve typography by manually adjusting the character spacing. Here we see the spacing between the 'r' and 'o' characters increased by applying +6% Tracking, this control being available on the Character Inspector:

Applying positive tracking to increase character spacing

Tracking can also be used to reduce character spacing. Here we see the spacing between the 'o' and 'w' characters reduced by applying -6% Tracking::

Applying negative tracking to reduce character spacing

An alternative way of adjusting font size is provided by the Width and Height controls, which can be used to stretch the font characters, and are available on the Character Inspector. In this case, a Height stretch has been applied:

Stretching characters by increasing the Height setting

In this final version the character Width has been increased and the Tracking has been adjusted:

Character Width and Tracking adjusted

Related Topics

Character Inspector

Paragraph Inspector

Mouse Actions