Thumbnails provide a whole document preview in a separate window, which supports reordering, duplicating, adding, deleting and navigating pages/spreads.
To show/hide the Thumbnails window choose menu option Window > Show/Hide Thumbnails (or keyboard shortcut ⌃⇧T Control-Shift-T). Alternatively, click the Show/Hide Thumbnails icon on the status bar, which is shown here:
![]()
Size and position the Thumbnails window to your own preference, for example, use a narrow window for a single scrollable column of page/spread thumbnails, or a larger window to display many thumbnails in a grid pattern. TIP: For documents with many pages move the Thumbnails window into full screen view, by clicking the green circle icon at the top left of the window. Click the green circle again to return the window to its previous size.
Adjust thumbnail size via the zoom slider across the bottom of the window.
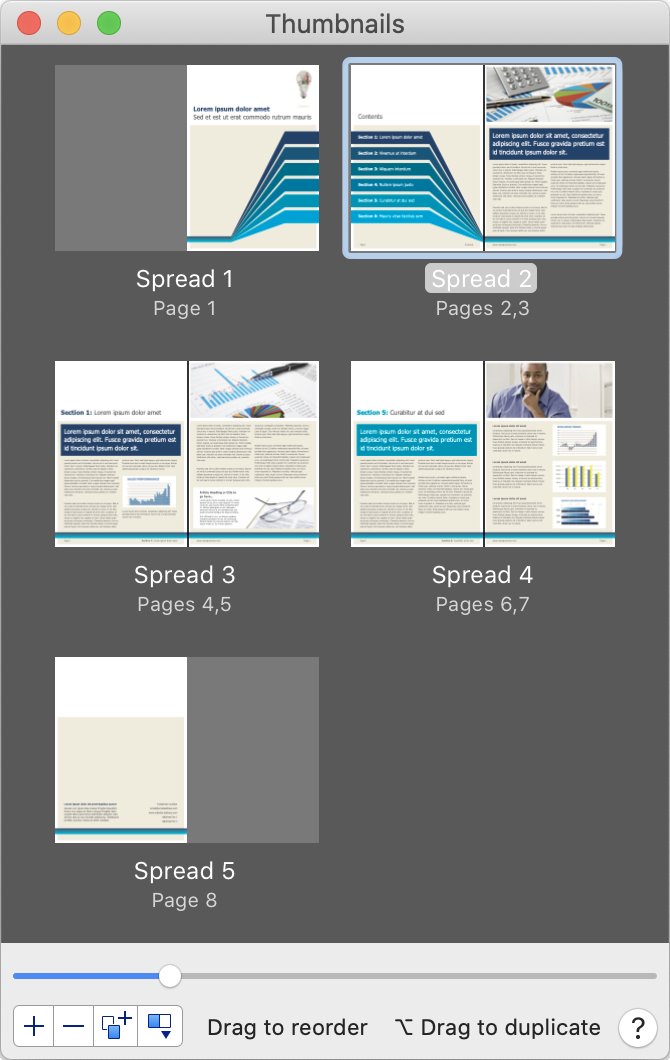
NOTE: In a document set up for spread editing the pages are displayed as 'spreads'. The first spread is a single page. From page two onwards the pages are displayed as two page spreads, with facing pages displayed next to each other. The last spread may contain one or two pages.
Here's how to perform the main page/spread management tasks:
To reorder pages/spreads, click and drag one to the required new position.
To add a blank page/spread, click the Add Page/Spread After Current Page/Spread icon at the bottom of the Thumbnails window.
To delete the current page/spread, click the Remove Current Page/Spread icon at the bottom of the Thumbnails window.
To duplicate a page/spread, click and drag one to the required new position, whilst holding down the Option key (which is marked ⌥). Alternatively, click the Duplicate Selected Page/Spread icon at the bottom of the Thumbnails window, which will add a duplicate page/spread immediately after the currently selected one.
This is the Duplicate Selected Page/Spread icon:
![]()
For documents set up for spread editing there are additional options for adding a single page or two-page spread to the end of a document, and for converting between these. Click on the Last Page/Spread Actions icon and a drop-down list of three options is provided, as shown here:
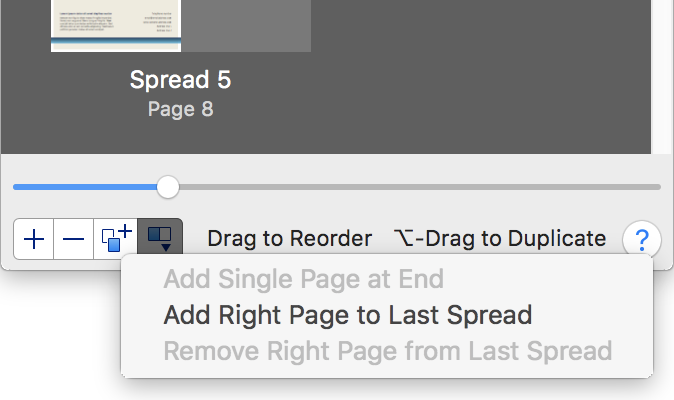
In the above example two of the options are disabled because the document already has a single left page at the end.
NOTE: In a document set up for spread editing the following additions are not allowed:
1. Inserting new pages/spreads before the existing single page one.
2. Inserting new single pages between existing spreads. This isn't allowed because existing facing pages must always remain facing each other.
3. Inserting new spreads after a last single page that's on the left.
To navigate pages/spreads, click any thumbnail to make it the currently selected page/spread and bring it into view in the current document window. The currently selected page/spread is highlighted in the Thumbnails windows with a light blue highlight outline.
TIP 1: As an alternative to clicking a thumbnail with your mouse, navigate the thumbnail selection using the keyboard arrow keys.
TIP 2: If you're using a computer with two monitors, keep the Thumbnails window open on the second monitor for quick page navigation.
Different users prefer to work in different ways. You can achieve equivalent page/spread manipulation via these other interfaces within the app:
Page & Spread Inspector.
Main menu (Edit > Page/Spread).
Contextual menu, with no current selection.